
本記事では、Flutterでローカルデータベースの実装方法を解説していきます。
Flutterを使ってDBを使ったデータ管理をしてみたい方は是非参考ください。

Flutterでローカルデータベースを実装する方法
SQLiteを使用しよう!
Flutterでローカルデータベースを実装するには「SQLite」を使用します。
SQLiteとは、軽量・コンパクト・省メモリで運用できるRDBMS(データベース管理システム)です。
端末にデータベースの情報を保存することで、データを永続化することが可能になります。
このSQLiteを使用するためにはsqfliteパッケージを使用します。

具体的な使い方
パッケージの取り込み
pubspec.yamlに以下の記述を追記しましょう。
dependencies:
  flutter:
    sdk: flutter
  sqflite: ^2.0.2 # 追加
sqfliteをインポートする
sqflite.dartをインポートしてください。
import 'package:sqflite/sqflite.dart';データベースの作成する
データベースの情報は端末上で「.db」という拡張子のファイルに格納されます。
データベースは以下のように記載することで構築することが可能です。
final Future database = openDatabase(
   join(await getDatabasesPath(), 'note_database.db'),
   onCreate: (db, version) {
     return db.execute(
       "CREATE TABLE note(id INTEGER PRIMARY KEY, text TEXT, priority INTEGER)",
     );
   },
   version: 1,
 );
データベースにデータを追加する
データベースにデータを追加する場合は、insert()メソッドを利用します。
例えばNoteといったclassデータの内容を追加したい場合は以下のようにします。
Future insertNote(Note note) async {
   final Database db = await database;
   await db.insert(
     'note',
     note.toMap(),
     conflictAlgorithm: ConflictAlgorithm.replace,
   );
 }
データベースの情報を参照する
データベースを参照する場合は,.query()メソッドを利用します。
例えば追加したNoteクラスの情報を参照した場合は以下のようにアクセスします。
Future<List<Note>> getNotes() async {
  final Database db = await database;
  final List<Map<String, dynamic>> maps = await db.query('note');
  return List.generate(maps.length, (i) {
    return Note(
      id: maps[i]['id'],
      text: maps[i]['text'],
      priority: maps[i]['priority'],
    );
  });
}
ちなみに.query()メソッドの中身には、以下のような条件式を設定することが可能です。
await db.query('note', where: 'text LIKE ?', whereArgs: ['${text}%']);データベースの情報を更新する
データベースの情報を更新する場合は、update()メソッドを利用します。
以下のように実装します。
Future<void> updateMemo(Note note) async {
  final db = await database;
  await db.update(
    'note',
    memo.toMap(),
    where: "id = ?",
    whereArgs: [note.id],
    conflictAlgorithm: ConflictAlgorithm.fail,
  );
}
データベースのデータを削除する
データベースのデータを削除する場合はdelete()メソッドを使用します。
Future<void> deleteNote(int id) async {
final db = await database;
await db.delete(
'note',
where: "id = ?",
whereArgs: [id],
);
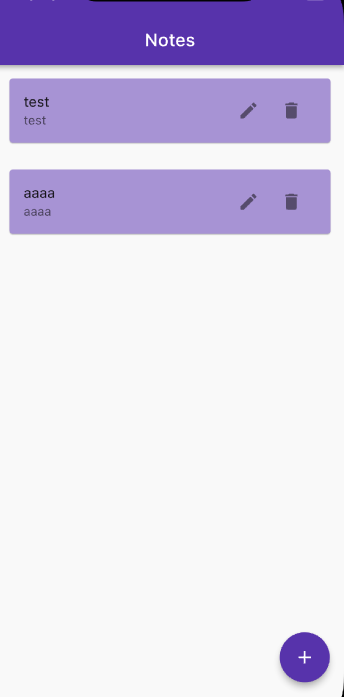
}実際にSQLiteを実装してみよう!
以下のようなToDoリストを実装してみましょう。
ソースコードは以下のサイトを参考にさせていただきました。

データベースを操作するCRUD機能を実装する
データベースを作成・参照・更新・削除する機能(CRUD)を実装しましょう。
「NoteViewModel.dart」を新たに作成して、以下を記載してください。
import 'package:flutter/foundation.dart';
import 'package:sqflite/sqflite.dart' as sql;

class NoteViewModel {
  static Future<void> createTables(sql.Database database) async {
    await database.execute("""CREATE TABLE items(
        id INTEGER PRIMARY KEY AUTOINCREMENT NOT NULL,
        title TEXT,
        description TEXT,
        createdAt TIMESTAMP NOT NULL DEFAULT CURRENT_TIMESTAMP
      )
      """);
  }

  static Future<sql.Database> db() async {
    return sql.openDatabase(
      'note.db',
      version: 1,
      onCreate: (sql.Database database, int version) async {
        await createTables(database);
      },
    );
  }

  static Future<int> createItem(String title, String? descrption) async {
    final db = await NoteViewModel.db();

    final data = {'title': title, 'description': descrption};
    final id = await db.insert('items', data,
        conflictAlgorithm: sql.ConflictAlgorithm.replace);
    return id;
  }

  static Future<List<Map<String, dynamic>>> getNotes() async {
    final db = await NoteViewModel.db();
    return db.query('items', orderBy: "id");
  }

  static Future<List<Map<String, dynamic>>> getItem(int id) async {
    final db = await NoteViewModel.db();
    return db.query('items', where: "id = ?", whereArgs: [id], limit: 1);
  }

  static Future<int> updateItem(
      int id, String title, String? descrption) async {
    final db = await NoteViewModel.db();

    final data = {
      'title': title,
      'description': descrption,
      'createdAt': DateTime.now().toString()
    };

    final result =
        await db.update('items', data, where: "id = ?", whereArgs: [id]);
    return result;
  }

  static Future<void> deleteItem(int id) async {
    final db = await NoteViewModel.db();
    try {
      await db.delete("items", where: "id = ?", whereArgs: [id]);
    } catch (err) {
      debugPrint("Something went wrong when deleting an item: $err");
    }
  }
}
ToDoのUIを実装する
main.dartを以下のように記載してください
import 'package:flutter/material.dart';

import 'NoteViewModel.dart';

void main() {
  runApp(const MyApp());
}

class MyApp extends StatelessWidget {
  const MyApp({Key? key}) : super(key: key);

  @override
  Widget build(BuildContext context) {
    return MaterialApp(
        debugShowCheckedModeBanner: false,
        title: 'Note',
        theme: ThemeData(
          primarySwatch: Colors.deepPurple,
        ),
        home: const HomePage());
  }
}

class HomePage extends StatefulWidget {
  const HomePage({Key? key}) : super(key: key);

  @override
  _HomePageState createState() => _HomePageState();
}

class _HomePageState extends State<HomePage> {
  List<Map<String, dynamic>> _memo = [];

  bool _isLoading = true;

  void _refreshJournals() async {
    final data = await NoteViewModel.getNotes();
    setState(() {
      _memo = data;
      _isLoading = false;
    });
  }

  @override
  void initState() {
    super.initState();
    _refreshJournals();
  }

  final TextEditingController _titleController = TextEditingController();
  final TextEditingController _descriptionController = TextEditingController();

  void _showForm(int? id) async {
    if (id != null) {
      final existingJournal =
          _memo.firstWhere((element) => element['id'] == id);
      _titleController.text = existingJournal['title'];
      _descriptionController.text = existingJournal['description'];
    }

    showModalBottomSheet(
        context: context,
        elevation: 5,
        isScrollControlled: true,
        builder: (_) => Container(
              padding: EdgeInsets.only(
                top: 15,
                left: 15,
                right: 15,
                bottom: MediaQuery.of(context).viewInsets.bottom + 120,
              ),
              child: Column(
                mainAxisSize: MainAxisSize.min,
                crossAxisAlignment: CrossAxisAlignment.end,
                children: [
                  TextField(
                    controller: _titleController,
                    decoration: const InputDecoration(hintText: 'Title'),
                  ),
                  const SizedBox(
                    height: 10,
                  ),
                  TextField(
                    controller: _descriptionController,
                    decoration: const InputDecoration(hintText: 'Description'),
                  ),
                  const SizedBox(
                    height: 20,
                  ),
                  ElevatedButton(
                    onPressed: () async {
                      if (id == null) {
                        await _addItem();
                      }

                      if (id != null) {
                        await _updateItem(id);
                      }
                      _titleController.text = '';
                      _descriptionController.text = '';

                      Navigator.of(context).pop();
                    },
                    child: Text(id == null ? 'Create New' : 'Update'),
                  )
                ],
              ),
            ));
  }

  Future<void> _addItem() async {
    await NoteViewModel.createItem(
        _titleController.text, _descriptionController.text);
    _refreshJournals();
  }

  Future<void> _updateItem(int id) async {
    await NoteViewModel.updateItem(
        id, _titleController.text, _descriptionController.text);
    _refreshJournals();
  }

  void _deleteItem(int id) async {
    await NoteViewModel.deleteItem(id);
    ScaffoldMessenger.of(context).showSnackBar(const SnackBar(
      content: Text('Successfully deleted a journal!'),
    ));
    _refreshJournals();
  }

  @override
  Widget build(BuildContext context) {
    return Scaffold(
      appBar: AppBar(
        title: const Text('Notes'),
      ),
      body: _isLoading
          ? const Center(
              child: CircularProgressIndicator(),
            )
          : ListView.builder(
              itemCount: _memo.length,
              itemBuilder: (context, index) => Card(
                color: Colors.deepPurple[200],
                margin: const EdgeInsets.all(15),
                child: ListTile(
                    title: Text(_memo[index]['title']),
                    subtitle: Text(_memo[index]['description']),
                    trailing: SizedBox(
                      width: 100,
                      child: Row(
                        children: [
                          IconButton(
                            icon: const Icon(Icons.edit),
                            onPressed: () => _showForm(_memo[index]['id']),
                          ),
                          IconButton(
                            icon: const Icon(Icons.delete),
                            onPressed: () => _deleteItem(_memo[index]['id']),
                          ),
                        ],
                      ),
                    )),
              ),
            ),
      floatingActionButton: FloatingActionButton(
        child: const Icon(Icons.add),
        onPressed: () => _showForm(null),
      ),
    );
  }
}
まとめ
いかがでしたか?
ローカルにデータを格納することができれば、APIなどでインターネットを使った情報のやり取りをする必要がなくなるのでオフラインでもアプリを機能させることができます。
是非この機会に習得してみてくださいね。
最新のFlutterの勉強方法 まとめ
Flutterを入門から実践レベルまで一通り学習できる方法をまとめました。